
Vanilla Pecan Pralines: A Southern Sweet Treat That Melts in Your Mouth
There’s something undeniably nostalgic about a warm, buttery praline that crumbles delicately on the tongue and coats the senses with rich vanilla and toasted pecans. A traditional Southern candy with roots in French culinary tradition, pralines have become a beloved staple in American sweet culture—especially throughout Louisiana and the Deep South.
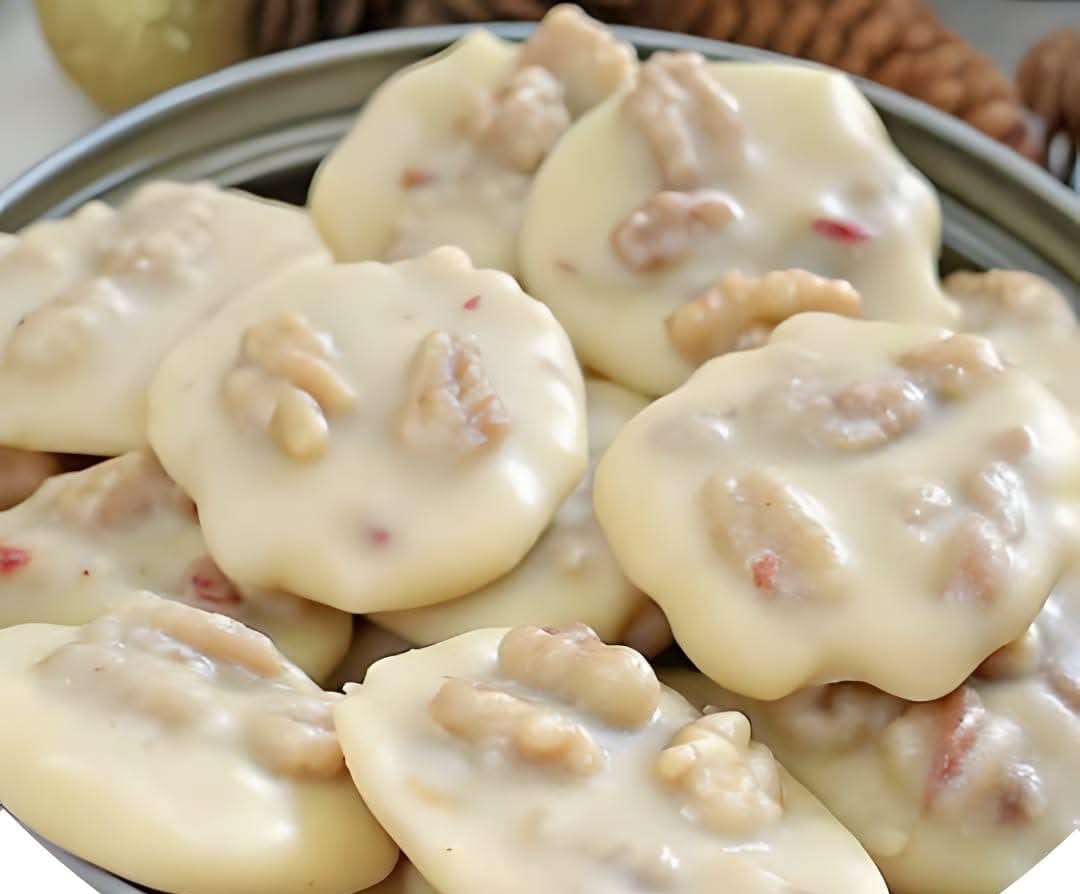
While traditional pralines are typically caramel-like in texture, the addition of white chocolate chips, marshmallow creme, and real vanilla in this version creates an ultra-creamy, melt-in-your-mouth texture that makes it nearly impossible to stop at just one. The recipe is simple yet impressive, and the result is a treat that’s both elegant enough for holiday gift boxes and homey enough for a weekend indulgence.
In this article, you’ll learn not only how to make the perfect batch of vanilla pecan pralines, but also why this recipe works, how to troubleshoot common candy-making issues, what variations to try, and how to store them for maximum freshness.
Ingredients You’ll Need
2 1/2 cups granulated sugar
7 oz evaporated milk (about half of a standard can)
1/4 cup unsalted butter, cubed
1 package (11 oz) vanilla or white chocolate chips (Ghirardelli preferred for extra creaminess)
4 oz marshmallow creme (about 1/2 cup)
1 teaspoon vanilla extract
2 cups chopped pecans (lightly toasted if desired)
Why This Recipe Works
Pralines are all about texture. You want a melt-in-the-mouth creaminess that holds its shape but isn’t too hard. The key lies in the ingredients and the timing.
The sugar and evaporated milk form the base of the candy, while the butter adds richness. White chocolate chips and marshmallow creme melt into the mixture, providing smoothness, structure, and a silky consistency. The vanilla deepens the flavor and enhances the sweetness, while the pecans add the perfect balance of crunch and nutty depth.
Step-by-Step Instructions
Step 1: Prep Your Work Area
Before you even begin melting anything, prepare your surface and equipment. Pralines set up quickly once dropped, so have your waxed paper, parchment paper, or silicone baking mat spread out and ready. Lightly spray with non-stick spray or butter if needed.
You’ll also want a sturdy medium saucepan, a long-handled spoon or heatproof spatula, and a candy thermometer (if available—optional but helpful).
Step 2: Combine the Base Ingredients
In your saucepan, combine the granulated sugar, evaporated milk, and cubed butter over medium heat. Stir continuously until the butter melts and the sugar dissolves. Bring the mixture to a boil, stirring constantly.
You want the mixture to reach a soft-ball stage (around 235°F/113°C) if you’re using a thermometer. If not, watch for the mixture to bubble steadily and slightly thicken—this takes about 6 to 8 minutes.
Step 3: Add the Sweet Creamy Elements
Once your base is boiling and thickened, remove it from heat and immediately stir in the white chocolate chips. Stir until completely melted and incorporated. Then, add the marshmallow creme and vanilla extract. Continue stirring until everything is creamy and smooth.
Step 4: Fold in the Pecans
Now it’s time to fold in the chopped pecans. Make sure they are evenly distributed throughout the mixture.
If you like your pralines with a little crunch, you can lightly toast the pecans in a skillet or oven before adding them. This adds another level of richness and aroma to the final product.
Step 5: Scoop and Shape
Working quickly, drop heaping spoonfuls of the praline mixture onto your prepared surface. You can use two spoons or a small cookie scoop. Allow the pralines to cool at room temperature until firm—about 30 minutes.
Do not try to reshape them once dropped—they’ll lose their silky smooth texture.
Step 6: Store and Enjoy
Once fully cooled and set, store the pralines in an airtight container at room temperature. Layer them with wax or parchment paper to prevent sticking.
These pralines are best eaten within a week for peak texture and flavor, though they can last up to two weeks in a cool environment.
Tips for Perfect Vanilla Pecan Pralines
Use fresh, quality pecans
Stale or old pecans can add an off flavor to your candy. Toasting enhances their nuttiness.
Don’t skip the marshmallow creme
It’s what gives these pralines their smooth, dreamy texture. It stabilizes the sugar and prevents them from getting too hard.
Watch your temperature
If you go too far past the soft-ball stage, your pralines may harden or become brittle. If you don’t reach it, they may not set properly.
Work quickly but carefully
The mixture sets fast once it starts cooling. Have your parchment or wax paper prepped and ready before you start.
Cool before storing
Make sure the pralines are completely cool before stacking or storing them—this prevents moisture from making them sticky.
Variations to Try
Chocolate Swirl Pralines
Add a handful of mini chocolate chips after stirring in the pecans and swirl gently before dropping.
Maple Pecan Pralines
Replace half the granulated sugar with brown sugar and add 1 teaspoon maple extract.
Salted Caramel Version
Add a sprinkle of flaky sea salt on top of each praline as they cool for a sweet-salty combo.
Coconut Pecan Pralines
Stir in 1/2 cup shredded coconut with the pecans for a tropical flair.
Nut-Free Option
Replace the pecans with sunflower seeds or crushed pretzels for a unique nut-free alternative.
Serving Ideas
Pack them into treat bags or jars for gifting
Add them to holiday dessert trays or cookie platters
Break them into small pieces and sprinkle over ice cream
Serve them alongside coffee or tea
Wrap individually for lunchbox surprises
Troubleshooting Common Praline Issues
Too Soft/Didn’t Set
Your mixture didn’t reach a high enough temperature. Make sure to cook until soft-ball stage (235°F).
Too Hard/Grainy
You likely overheated the sugar or stirred too vigorously after removing from heat.
Sticky After Storage
Humidity or stacking too early. Store with wax paper between layers in a cool area.
Separated Butter
Mixture was overcooked or not stirred enough during the addition of chips/creme. Stir thoroughly and smoothly.
Nutritional Information (Per Serving, Approximate)
Serving Size: 1 praline
Calories: 180
Fat: 10g
Carbohydrates: 22g
Sugar: 18g
Protein: 2g
History of Pralines
The original praline dates back to 17th century France, where almonds were coated in caramelized sugar as a delicate treat for nobility. French settlers brought the tradition to New Orleans, where the recipe evolved using locally available pecans and later cream.
What started as a fancy confection transformed into a rustic, buttery candy with regional charm. Today, pralines are a cultural symbol of hospitality in Southern kitchens.
Why You’ll Love This Version
It’s smoother and creamier than traditional pralines
Uses pantry staples
No candy thermometer required (but helpful)
Perfect for gifting or sharing
Tastes like vanilla fudge meets candied pecans
Make It a Gift Idea
Place cooled pralines in cupcake liners, stack in a bakery box, and tie with twine. Add a handwritten tag and a ribbon for a personal touch. These make excellent gifts during the holidays, for teachers, or as a thank-you treat.
Final Thoughts
Vanilla pecan pralines are the kind of candy that reminds you of everything good about homemade sweets—rich, nutty, sweet, and perfectly creamy. This recipe is approachable for beginners but impressive enough for special occasions.
Once you make these once, they’ll quickly become a go-to favorite. Whether you’re serving them at a family gathering or sharing them with friends, each praline is a bite of Southern comfort wrapped in sweetness.